Join 30k+ business owners every Sunday at 5pm for actionable automation tips to kickstart your week.
AVERAGE READ TIME
4 Minutes
Written by
POST PUBLISH DATE
How to Make Automated Emails in MailerLite 2024
Here are four simple tips for email marketing and automation in 2024:
- Start with a Strong Foundation: When setting up your automation, begin with a clear trigger, like when a subscriber joins a specific group. This ensures your emails are timely and relevant from the get-go.
- Craft Compelling Content: Your subject line and sender name are crucial for open rates. Combine something recognizable (like your name or company) with an irresistible subject line to grab attention.
- Timing is Everything: Use delays strategically to send your emails when your subscribers are most likely to engage. Consider their habits and preferences to choose the best day and time for your messages.
- Keep the Conversation Going: After your initial automation sequence, move subscribers to a regular newsletter group. This helps you maintain contact and continue delivering value, keeping your brand top of their mind.
Hey there! Wondering when's the best time to hit 'send' on your emails? Curious about what to actually send out? Or maybe you're scratching your head on how to get those email automations up and running in MailerLite? Well, you're in luck! We're going to break it all down - super simple, super easy. No jargon, no complications. Just the essentials to make your email life in 2024 a whole lot easier. Stick around, it's going to be a breeze!
Navigating MailerLite: Setting Up Your First Automation
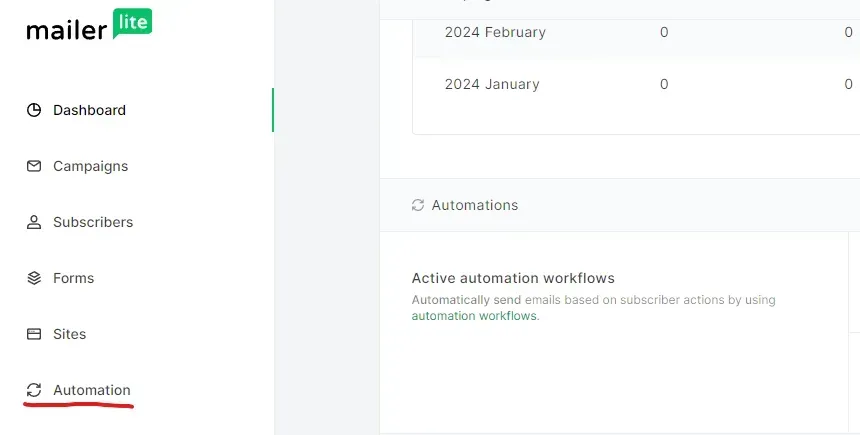
Getting started with MailerLite? Awesome! Once you're logged into your account, take a quick look at your dashboard on the left. You'll find a section labeled "Automation." That's where the magic happens. Whether you're new to this or have been around the block, we're aiming to create a new automation today. If you've already got some set up, no worries – adding another one into the mix is a breeze. So, let's jump into making a new automation from scratch. I'll guide you through every step.
When you click into the automation section, you'll see a few options pop up. MailerLite is pretty cool because it caters to everyone – whether you're running an e-commerce site, looking to book more calls, or just aiming to get more eyes on your newsletters. They offer a bunch of templates like win-back campaigns, new promotions, welcomes for new subscribers, and even abandoned cart emails. But hey, today we're crafting one from scratch. Once you've got the hang of this, feel free to play around with the templates to speed things up in the future.
Quick Tips for Starting Your Automation:
- Jump Straight to Automation: It's under the dashboard on the left. Can't miss it.
- Creating New is Cool: Even if you have other automations, making a new one is easy peasy.
- Templates are Your Friends: After you've got the basics down, templates can be a massive time saver. Whether it's welcoming newbies or reminding shoppers about their carts, there's something for every goal.
- Custom or Template? Starting from scratch is great for learning. Once you're comfortable, templates can get you moving faster.
Building Your Automation: The Starting Point
So, you've decided to create a new automation. Let's name it "New" and dive right into the building phase. Once you've opened the page to start crafting your automation, the first thing you need is a trigger – basically, the reason this automation kicks off.
I usually go with "when a subscriber joins a group." Here's a pro tip: set up groups in your MailerLite account for different categories like New Leads, New Customers, or Abandoned Carts. Once you pick the group, it becomes the trigger for your automation. If you haven't set up a group yet, no stress! You can easily add a new one right there and then by typing in the name and clicking "add a new group." This is your starting line for adding people and triggering the automation.
But hey, there's more than one way to start this party. If you're playing around with MailerLite's landing page builder or form builder, you can set those up to automatically trigger your automation. This is super handy because it saves you the hassle of using external tools like Zapier to connect your forms. Other cool triggers include link clicks within your emails, updates to subscriber info (like adding an address or company name), and even setting up automations for anniversaries or special dates.
While I lean towards the group option, feel free to explore and pick what suits your needs best. And here's something important: allow subscribers to repeat the workflow. Most of the time, it's a good idea. Why? Because someone might sign up again for a freebie or update their info, and you'll want them to enjoy that smooth experience your automation provides, whether it's today or a month from now.
Starting Your Automation Right:
- Pick a Trigger: Starting with a group is simple and effective. New Leads or Abandoned Carts are great examples.
- Set Up Groups: If you don't have a group yet, just make a new one on the spot.
- Use MailerLite Tools: Landing page and form builders can automatically kick off your automation, making life easier.
- Allow Repeats: Letting subscribers go through the automation again can be beneficial, especially for offers or updates they might be interested in later.
Crafting Your Email Funnel: The Basics
Once you've got your trigger set up, you might be wondering if folks should go through your workflow more than once. If it's a one-and-done deal, just switch off the repeat option and save. Now, let's get to the fun part: building your email funnel. MailerLite gives you a bunch of choices to customize how you interact with your subscribers.
You've got straightforward options like sending an email, waiting a bit (that's the delay option), and then sending another email. You can also add conditions to segment subscribers based on their actions, like whether they made a purchase. Plus, there are different actions for next steps, like moving them to your newsletter list or elsewhere in MailerLite. And yep, A/B testing is on the table too.
I'm kicking things off with a simple delay. Normally, I don't put a delay before the first email because you usually want your subscriber to get that welcome or confirmation email ASAP. But, here's a tip: adding a short delay, like two minutes, can prevent your subscriber from getting bombarded if they're signing up for multiple things at once. It's all about timing.
Next up, adding that first email. This is key because when someone signs up, they're expecting something from you right away. Quick note: if you haven't authenticated your domain yet (this is just my demo account, so don't sweat it here), make sure to do it. It's pretty easy, and hey, I've even got a YouTube video where I walk you through the process to make it super straightforward.
Crafting Compelling Email Content: Subject Lines and Sender Names
When it's time to write your first email, the label part is just for you. So, if you're keeping track and want to remember this is your first email, just tag it as "Email One" in your own notes. Now, for the real deal: the subject line. This is what your subscribers see first, so you've gotta make it catchy. Think along the lines of "Here's Your Guide!" or "You Left Something in Your Cart." Your goal? Make them want to click open.
Choosing how you appear in your subscriber's inbox is equally crucial. Many folks know me as Brad from AutomationLinks, so I use both my name and the company name. It's a game-changer for open rates. Why? Because some people might recognize your company, and others might look out for your name. Combining both ensures no one's left scratching their heads, wondering, "Who's this?" So, remember, mixing your personal touch with your brand identity can significantly boost those opens.
Key Takeaways for Your Email Setup:
- Subject Line: Make it irresistible. Your subject should scream "open me!" to get that guide or nudge about their abandoned cart.
- Sender Name: Blend the personal with the professional. If people know you by your name and your company, include both. It bridges the gap, making your emails feel more like a message from a friend they trust and want to hear from.
Designing High-Opening Emails: Templates and Tactics
Now, about the actual email you're going to send – let's talk design. While we're not diving into design specifics today, it's good to know MailerLite offers a bunch of templates to choose from. You've got everything from plain text to fancy newsletter styles. But here's the golden nugget: if you're after sky-high open rates, like 60 to 80%, I've got something special to share.
Meet my perfect email formula – this thing averages an 80% open rate for us. It's like a secret sauce for turning leads into loyal customers. And because I'm all about sharing the love, I'm throwing in the link right here. You can grab this perfect email template, copy it, paste it into your MailerLite account, and watch those open rates soar. Why does it work so well? It’s all about grabbing attention and making your readers eager to see what you have to say, turning more of those curious clicks into committed customers.
Essentials for Your Email Design:
- Choose the Right Template: With options from plain text to snazzy newsletters, pick one that fits your message.
- Aim for High Open Rates: Using tested templates and tactics can significantly boost your email's performance.
- Grab the Perfect Email Template: It's crafted to capture attention and convert leads, and it's available for you to use and make your campaigns more effective.
Streamlining Your Funnel: Adding Conditions for Personalization
After you've polished and saved Email One, it's time to spice up your automation with a smart next step: adding conditions. This is where you get to be really clever with your email funnel. Imagine this scenario: someone signs up, receives your first email, and then books a session with you. You wouldn't want to bombard them with the same follow-up emails designed for those who haven't engaged yet, right? Similarly, if someone abandons their shopping cart on your site but decides to make a purchase later, there’s no need to keep sending those "Come back!" emails. They should be moved to your happy customer group instead.
Here's how to do it: Set conditions based on actions like scheduling with you, making a purchase, or even clicking a link. MailerLite makes this easy with options to adjust your funnel according to whether they join another group, start another workflow, or even based on custom fields like "customer" status. This ensures that your communication is not only relevant but also timely. By filtering out contacts based on their actions, you keep your email list clean and your messages targeted. This step is crucial for maintaining a personal touch and ensuring that your emails resonate with each subscriber's current relationship with your brand.
Why Conditions Matter:
- Better Targeting: Ensure that your emails are hitting the right inboxes at the right time. No more irrelevant messages.
- Enhanced Personalization: Tailoring the journey based on subscriber actions increases engagement and satisfaction.
- Cleaner Lists: By dynamically updating who gets what email, you keep your lists efficient and your engagement rates high.
Timing Your Emails and Wrapping Up Your Automation
Next up, let's talk about adding another email to your sequence. But here's the twist: you only want it sent out at a specific time or day. This is where setting a delay comes into play. You can opt for a particular time of day – say, 9:00 AM – but I've found choosing a specific day of the week to be super effective. Why? Because I know my customers are more likely to be checking their emails on weekdays rather than weekends.
Now, your audience might be different. They might be night owls or weekend warriors when it comes to email checking. The key is to understand when they're most active or when they engaged with your first email. Timing is crucial, and showing that you're considerate of when they're likely to be in their inbox can make your emails more welcome.
Once you've nailed down the timing, it's time to add Email Two. Just like before, label it for your reference, and then dive into crafting your message. And here's a pro move: after wrapping up your email series, consider adding an action to move subscribers to another group. For example, once they've gone through your automation, you could shift them to a "Newsletter Group." This keeps the communication flowing, transitioning them from your targeted automation to regular updates via your newsletter. This seamless move ensures you're always in touch, keeping your brand top of mind.
Optimizing Email Timing:
- Set a Delay: Choose the best time or day to send your next email based on when your subscribers are most engaged.
- Consider Your Audience: Tailor the timing to when your audience is typically checking their emails. Use previous engagement data as a guide.
- Transition to Regular Updates: After the automation sequence, move subscribers to a newsletter group for ongoing engagement.
Wrapping It Up: Mastering Email Automation with MailerLite
And there you have it – a straightforward guide to setting up and optimizing your email automations in MailerLite for 2024. From timing your emails just right to personalizing content based on subscriber actions, we've covered the essentials to make your email marketing both effective and efficient. Remember, the goal isn't just to send emails; it's to send the right emails at the right time to the right people.
As you dive into MailerLite and start crafting your automations, keep these key points in mind: use conditions to tailor your messages, set delays to optimize timing, and always aim to add a personal touch. Whether you're welcoming new subscribers, nurturing leads, or re-engaging past customers, each email is an opportunity to connect and convert.
But don't stop here. Experiment with different templates, test your timings, and always be on the lookout for ways to improve your open rates and engagement. Email marketing is an evolving field, and staying adaptable is key to success.
When is the best time to send my emails?
The best time to send emails depends on your audience's habits. Generally, weekdays and mornings work well. Analyze your past engagement data to find when your subscribers are most active and schedule your emails accordingly.
What should I include in my emails?
Focus on clear, engaging content. For new subscribers, send a welcome email with useful information. For abandoned carts, remind them of their items. Make your subject lines catchy and personalize your messages to boost engagement.
How do I set up email automations in MailerLite?
Go to the "Automation" section in your MailerLite dashboard. Choose to create a new automation and select a trigger, like when a subscriber joins a group. Add emails, set delays, and use conditions to personalize the experience. Explore templates for efficiency, but start with a custom setup to learn the basics.
THE AUTOMATION
NEWSLETTER
Join 30k+ business owners every Sunday at 5pm for actionable automation tips to kickstart your week.